CB Sounddesign
Eight voices · Four engines
Operator's manual · v1.0
CB Drum Engine
Eight drum voices, each free to run any of four synthesis engines — analog, noise, FM or modal — or to play a WAV you drop on it. A step sequencer per voice, a Euclidean generator behind it, and a glue bus at the end. Played from the computer keyboard, from MIDI hardware, or from its own pattern.
The voice
Engine, tune, decay, level
The pattern
Steps, Euclid, chance, humanize
The bus
Drive, crush, filter, glue
Where to start
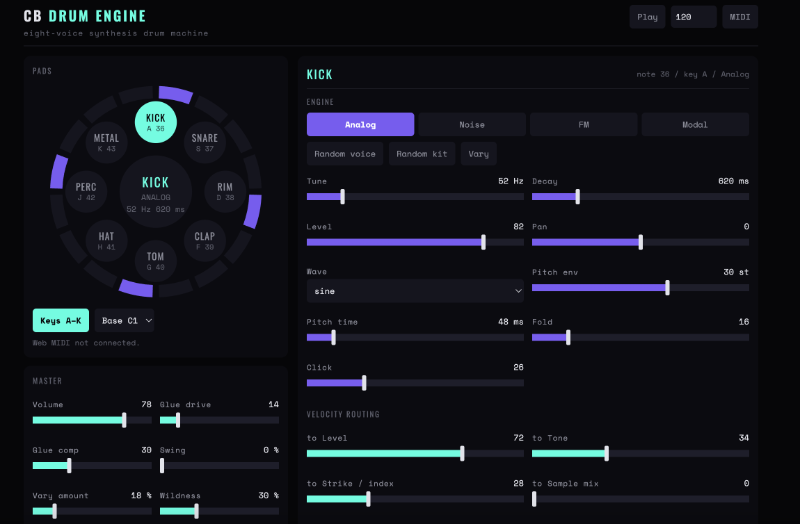
Press Play, then click steps on the Kick lane until it sounds like a pattern. Everything else in this manual refines that. The one control worth understanding before anything else is Engine — it decides which of the parameter sets below you are actually looking at, because the panel changes with it.
Figure 1 — The whole window: the radial pad ring with the selected voice at its centre, the engine panel for that voice, and the master block below
Chapter one
The transport
A single row across the top: what plays, how fast, and how hard.
Play / Stop
Starts and stops the sequencer. The Space bar does the same from anywhere on the page. Stopping leaves voices ringing rather than cutting them — a stop in the middle of a long modal tail sounds like a stop, not a fault.
Tempo
BPM. The sequencer, the Euclidean divisions and the swing all follow it. Changing tempo mid-pattern is sample-accurate from the next step, not the next bar.
Swing
Delays every second step. Small amounts read as feel; past about a third of the way the pattern becomes a shuffle, which is a decision rather than a nudge.
Vary amount / Wildness
The two generative amounts. Vary moves parameters slightly on each pass so a loop does not read as a loop. Wildness decides how far it is allowed to move. Vary at zero is a strictly repeating machine.
Keys A–K / Base
The keyboard row that plays the eight voices, and the base octave the ring is mapped from — Base C1 puts Kick on MIDI 36. Set the base to match what your controller sends on its pads rather than moving the pads. Web MIDI not connected under the ring means no hardware is attached.
Chapter two
The eight voices
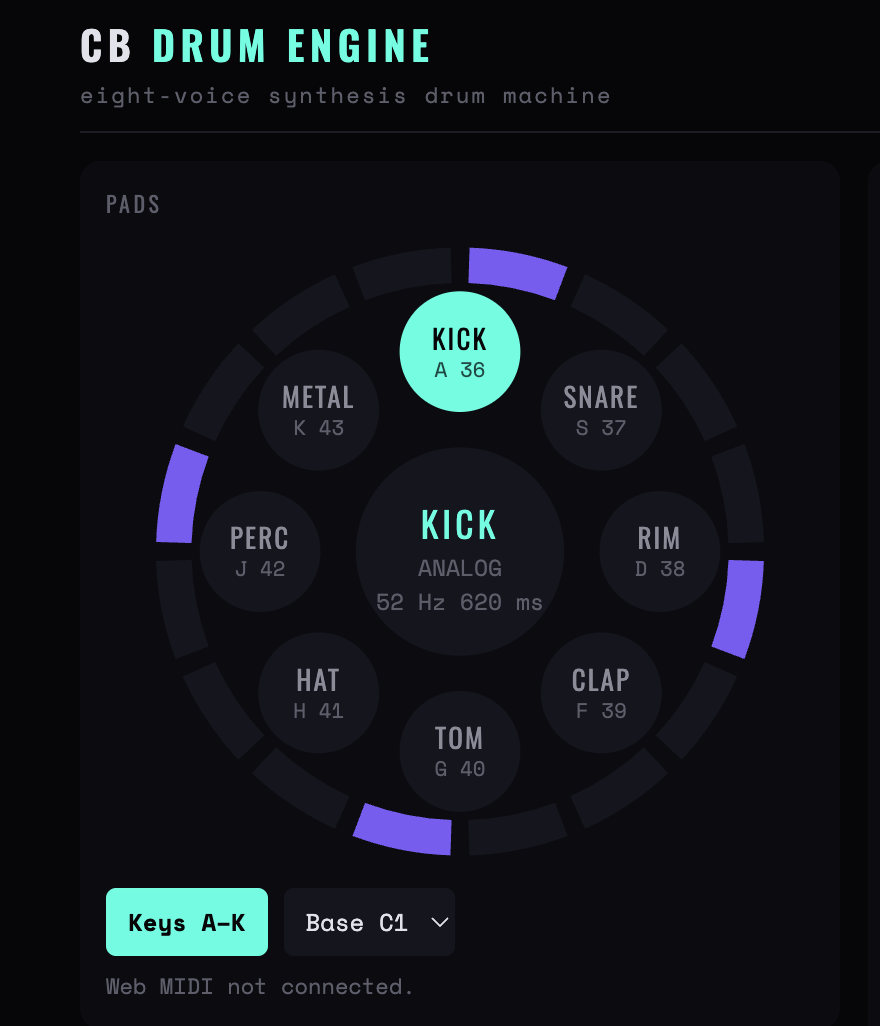
Eight pads in a ring — Kick, Snare, Rim, Clap, Tom, Hat, Perc, Metal — each with its keyboard letter and MIDI note printed on it, and the selected voice’s name, engine, tune and decay at the centre. The names are a starting point, not a constraint: every voice has the same engine choice, so the pad labelled Snare can be a second kick.
Figure 2 — The pad ring. The selected pad is filled; its name, engine and current tune and decay are printed at the centre. Each pad carries its key and MIDI note
Shared per voice
Engine
Analog, Noise, FM or Modal. Changing it swaps the parameter block underneath; the tune, decay and level you set are kept.
Tune
Base pitch. On analog and FM it is the fundamental; on modal it moves the whole resonator; on noise it moves the band.
Decay
How long the voice rings. The single most useful control for turning a kick into a tom or a clap into a burst.
Level / Pan
Voice gain and stereo position. Levels are pre-glue, so a loud voice hits the bus compressor harder as well as being louder.
Pitch env / Pitch time
Depth and duration of the pitch sweep at the start of the hit. A short deep sweep is the click of a kick; a long shallow one is a tom.
Choke group
Voices in the same group cut each other off. The classic use is a hi-hat pair — closed chokes open — and it is also how you stop two toms from stacking.
Velocity routing
Four amounts per voice — to level, to tone, to strike or index, and to sample mix. This is what makes a voice respond to how hard it is played rather than just getting louder: route a little to tone and a lot to strike and the hard hits change character, not only volume.
Random voice / kit
Rerolls the selected voice, or all eight. Faster than dialling from scratch and a good way to find engine settings you would not have chosen — keep what works and reroll the rest. Vary beside them toggles the per-pass variation for that voice.
Analog
Wave
The oscillator shape. Sine for kicks and toms, triangle for something softer, saw when you want the voice to cut through a mix.
Fold / Drive
Waveshaping before the amp. Fold adds harmonics without raising level much; drive raises both.
Click
A short transient on top of the body. This is what makes an analog kick audible on small speakers.
Noise
Band / Width
Centre frequency and bandwidth of the filtered noise. Narrow and high is a hat; wide and low is a floor tom hit with a brush.
Tilt
Spectral slope across the band. Tilt up for snares that sit above the kick, down for something duller and further back.
Snap / Body mix
The transient and how much of the tuned body sits under it. A snare is roughly equal parts; a clap is almost all snap.
FM
Ratio
Modulator frequency as a multiple of the carrier. Whole numbers give pitched, bell-like results; ratios just off a whole number give metallic ones.
Index / Index decay
Modulation depth and how fast it falls. High index with a fast decay is a metallic attack on a clean body — the standard FM drum trick.
Carrier
The carrier waveform. Sine is the honest FM voice; anything else is already distorted before the modulator arrives.
Modal
Partials
How many resonant modes ring. Few partials is a wood block; many is a cymbal.
Inharmonic
How far the partials are pushed off a harmonic series. At zero the voice is pitched; pushed hard it is metal.
Damping
How fast the high partials die relative to the low ones. This is what separates a struck pipe from a struck plank.
Strike pos / Exciter
Where the resonator is hit and with what. Striking near the centre emphasises the fundamental; the exciter choice decides whether the hit reads as a stick, a mallet or a scrape.
Sample layer
Load WAV / Reverse
Drop a file on the panel or load it. Reverse flips it, Layer keeps the synthesised voice under it, Clear removes it. Samples stay in this session only — a saved kit stores parameters, not audio, so archive the WAVs yourself.
Start / Pitch / Volume
Sample offset, transposition and gain. Start is the one to reach for first — most of a kick sample that will not sit in a mix is the first few milliseconds.
Chapter three
The pattern
Each voice owns a lane of steps. You can draw them, or let the Euclidean generator fill them, or both — the generator writes into the same lane you are drawing on.
Step grid
Click to place a hit, click again to clear. Velocity is per step, so a lane can carry its own dynamics rather than relying on the humanize amount. Accent raises the selected steps; Random lane and All lanes fill one or every lane at once.
Length
Steps in the lane. Lanes of different lengths drift against each other, which is the cheapest way to get a pattern that takes sixteen bars to repeat.
Division
The note value one step represents. Set the hats to a faster division than the kick rather than filling a slow lane with rests.
Euclid pulses
Spreads a number of hits as evenly as possible across the lane. Five pulses in sixteen is the standard useful answer; try it on a perc voice before drawing anything by hand.
Rotate
Turns the Euclidean pattern without changing which hits it contains. Rotating a pattern until the first hit lands on the downbeat is usually the difference between a groove and a mistake.
Direction
Forwards, backwards, or alternating. Backwards on a hat lane is inaudible; on a tom fill it is the point.
Chance
Probability that a placed step actually fires. Around three quarters keeps the pattern recognisable while never repeating exactly.
Humanize
Random timing offset per hit, in milliseconds. A few milliseconds is a live drummer; more than about twenty is a drummer you would not hire.
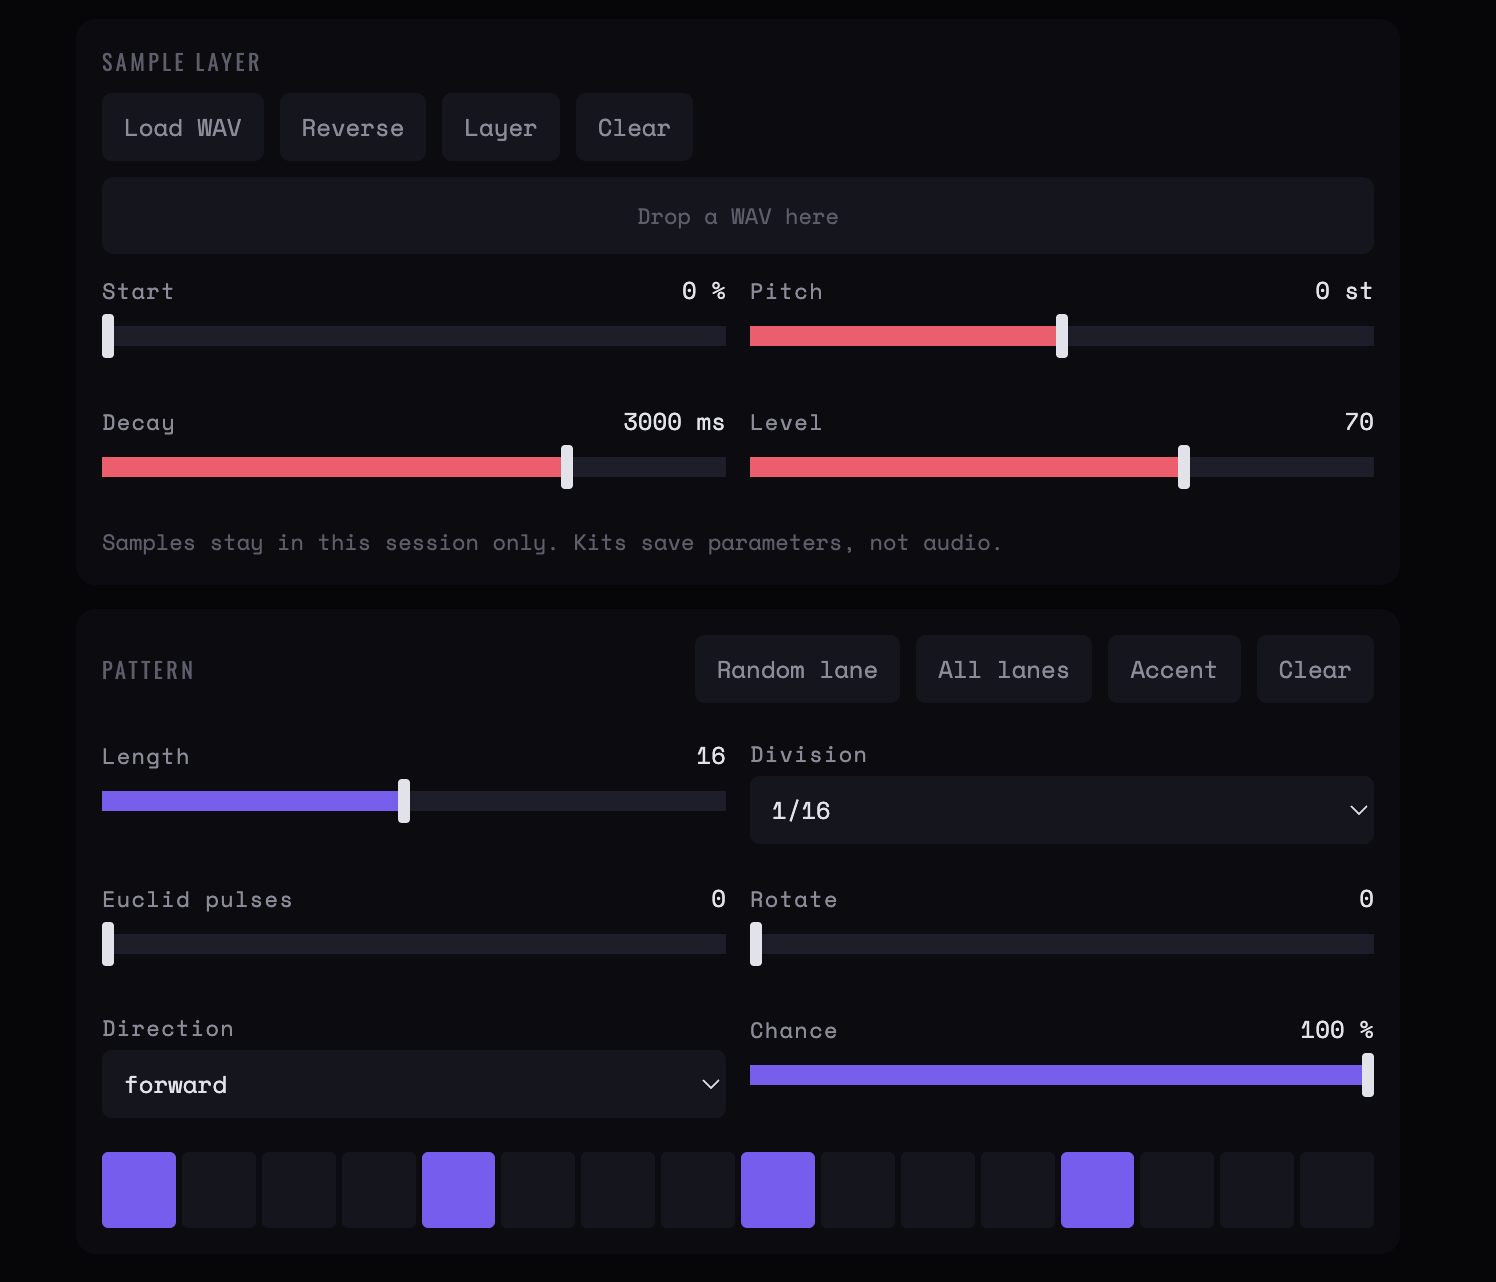
Figure 3 — The sample layer and the pattern lane beneath it, with length, division, Euclid pulses, rotate, direction and chance above the sixteen steps
Chapter four
The bus
Everything lands on one bus. Four controls, in the order the signal meets them.
Drive
Saturation across the whole kit. Small amounts glue; large amounts are the sound of a drum machine through a preamp.
Crush
Bit and rate reduction. Distinct from drive: crush removes information, drive adds harmonics. Crush on its own with no drive is the cleaner lo-fi.
Filter / Cutoff / Reso
One filter for the kit. Useful as a performance control — sweeping the whole kit up into a drop is a two-second gesture here.
Glue drive / Glue comp
The bus compressor. Comp pulls the kit together; glue drive pushes into it. Set comp first with drive at zero, then add drive until the kit stops sounding like separate voices.
Chapter five
Kits and MIDI
Save / Load kit
Stored in this browser. Kit saved in this browser means exactly that — it is not a file, and clearing site data removes it. Export the kit to a file for anything you intend to keep.
Import / Export kit
A JSON file with every voice, lane and bus setting. This is the portable form and the one to archive.
MIDI in
Plays voices from hardware from the base note upwards. If No MIDI inputs found appears with a controller connected, the browser has no MIDI support — Chrome, Edge and Brave do; Safari does not.
MIDI access was blocked
A permission refusal, not a missing device. Reload and allow the prompt.
Chapter six
Making a kit from nothing
One pass that produces a usable kit rather than eight voices that each sound good alone.
- Kick first, alone. Analog, sine, short pitch sweep, decay until it stops before the next step. Everything else is built around its length.
- Snare second. Noise engine, band around the kick's third harmonic so the two do not fight, snap high.
- Hats as a choke pair. Two noise voices, same band, different decays, same choke group.
- Two perc voices on modal. One with few partials and heavy damping, one with many and little. That pair covers most of what a kit needs.
- Patterns by Euclid, then edited. Fill each lane with a pulse count, rotate until the downbeats land, then remove the hits you do not want. Drawing from empty takes longer and sounds more deliberate.
- Chance and humanize last. A few percent of each. Add them before the bus, not after — they change how hard the compressor works.
- Bus to taste, then back off. Set glue comp until the kit moves as one thing, then reduce it by a third. The setting that sounds best on a loop is usually too much in a track.
CB Sounddesign · Drum EngineOperator's manual · v1.0